Finding a reliable way to fix squeaky floor sounds can save time and money in your home. This short guide shows practical, low-cost steps you can take without removing your expensive flooring.
Many homeowners face noisy floors and worry they need big repairs. Our expert tips outline simple techniques and common causes so you can address the problem quickly.
With basic tools and clear instructions, you can reduce creaks and protect your boards. This guide focuses on repairing the structure beneath the surface and restoring quiet to living areas.
Read on for a friendly, step-by-step plan that keeps your flooring intact and brings peace back to your rooms.
Understanding Why Your Floors Squeak
That unexpected creak underfoot usually comes from movement in the layers beneath your boards. Knowing the common causes helps you target the right repair without removing surface material.
Common Causes of Floor Noise
Most noise comes from rubbing or loose connections. Two boards may scrape against each other, or a board can shift where it meets a joist.
- Changes in temperature cause wood to expand and contract, creating friction and a persistent squeak.
- Subfloor materials can separate from joists over time, leading to noticeable noise when walked on.
- Boards that are not tightly fastened may move and rub against neighbors, which often creates the loudest squeaks.
Environmental Factors and Humidity
Humidity plays a big role in how your floors behave. High moisture makes wood swell and press against adjacent boards.
Low humidity shrinks the wood and can open gaps that shift under weight. Regular subfloor maintenance helps prevent these cycles from becoming a long-term problem in your home.
Essential Tools for Your Squeaky Floor Fix
The right gear makes this DIY guide far easier to follow. Gather tools before you start so you can work steadily and avoid repeated trips to the shop.
Start with a drill and a set of bits suitable for hardwood and subfloor materials. An electric drill speeds work, while a manual screwdriver helps with delicate adjustments.
- Drill with various bits — for installing screws into hardwood or subfloor.
- Pry bar and putty knife — to lift boards slightly and clear gaps safely.
- Quality screws of the correct type — these keep boards snug and quiet over time.
- Tape measure — to locate joists and mark exact repair points.
- Manual screwdriver plus an electric drill — useful for different floors and tight spots.
These items cover most repair scenarios. With them on hand, you can secure wood panels, tighten connections, and reduce noise without pulling up boards.
Quick Solutions Using Lubricants
Simple lubricants can reduce rubbing between boards and cut down on annoying noise. This is a low-cost, noninvasive step you can try before any heavy repairs.
Applying Powdered Lubricants
Use powdered soapstone, talcum powder, or powdered graphite as a dry lubricant. These powders settle into gaps and lower friction where wood contacts wood.
- Sprinkle a small amount of powder into seams and cracks along the floorboards.
- Work the powder into the surface with a soft rag or brush so it reaches the contact area.
- Let the powder sit for a few minutes, then vacuum the excess to keep the surface clean.
- This step is a quick way to help fix squeaky floors without complex tools or costly repairs.
Doing this can minimize damage caused by constant rubbing and quiet the most common squeak sources. Try this simple step first—it often restores peace without lifting boards or replacing materials.
Securing Subfloors from Above
Reinforcing the subfloor from above is a fast way to stop many common squeaky floors and restore quiet in living areas.
Use SPAX T-STAR plus Flat Head HCR-X screws when driving into wood. These fasteners cut splitting risk and hold tight in construction joins.
Drive screws at a 45-degree angle where the subfloor meets joists. That angle locks the layers together and reduces creaks and noise.
The 4CUT Point helps the screw countersink cleanly. You often do not need pre-drilling, which speeds the job and gives a flush finish to the board surface.
- If you have access to the space below, driving screw from below gives extra purchase and a rock-solid connection.
- Add blocking between joists with construction-grade wood to stiffen the span and stop movement that causes squeaks.
- Target problem floorboards by securing the subfloor near the joist line, then test by walking the area to confirm the noise is gone.
Repairing Floors from Below
Repairing from below keeps your surface intact while targeting the structural issue. If you have access to a basement or crawl space, you can locate the exact spot creating the noise and plan targeted repairs.
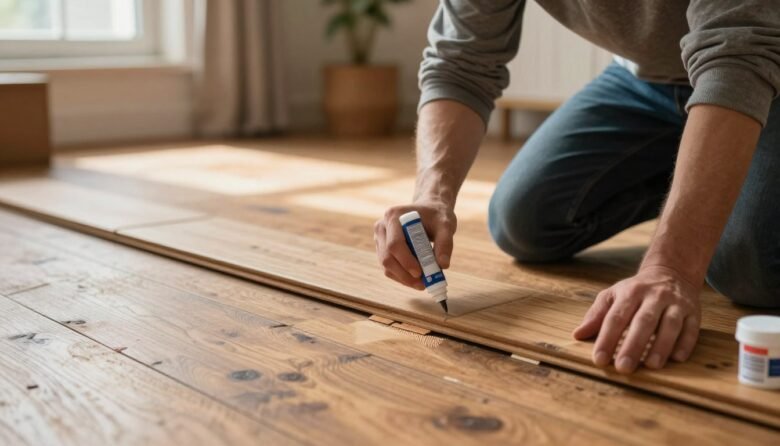
Using Shims and Glue
Wedging a wood shim between a joist and the subfloor closes the gap that often causes squeaks. Add carpenter’s glue to the shim for a lasting bond that keeps the board snug.
Drive a screw through the shim into the joist to lock it in place when needed. This method is one of the simplest steps to fix squeaky floors without disturbing the visible flooring.
Installing Support Blocks
Cut 2″ x 8″ blocks to fit between joists and nail or screw them tight to add support. These blocks add tension and reduce movement that makes noise.
- Locate the problem spot from below to save time and materials.
- Secure a support piece to a warped joist with a drill and screws for a flat bearing surface.
- Use shims sparingly to avoid over-tightening the wood and creating new gaps.
Working under the subfloor is a practical DIY approach. These steps restore stability to joists and floorboards and cut down recurring noise with minimal surface work.
Techniques for Hardwood Flooring
When dealing with hardwood, small, precise steps preserve the look while solving noise issues.
Start by drilling a 3/32-inch pilot hole when using a Counter-Snap Kit. This hole guides the fastener and reduces splitting in hardwood floors.
The Counter-Snap Kit lets you drive a screw until the head snaps off below the wood surface. That creates a clean, flush repair on the visible surface.
- After the screw is set, fill the tiny hole with wood putty that matches your hardwood color.
- Let the filler dry fully, then sand lightly so the repair blends with the surrounding surface.
- As a gentle alternative, apply powdered graphite or talcum powder between boards to cut friction in your wood flooring.
These simple methods preserve hardwood appearance and cut noise without major work. Use the right tools and a careful hand for a neat, lasting result.
Addressing Squeaks in Carpeted Areas
Carpeted areas need a different approach than bare boards. The carpet hides the spot, so you must target the subfloor and joist beneath the surface.
Using Specialized Kits and Simple Alternatives
The Squeeeeek-No-More Kit is made to secure the subfloor to the joist through carpet without removing the covering. It uses a special breakaway screw that you drive through carpet and subfloor into the joist. The head breaks off below the surface, leaving a tidy repair.
Start by scanning with a stud finder to locate the nearest joist to the noisy area. Mark the spot, then drive the kit’s screw straight into the joist. Test by walking on the spot; repeat nearby if needed.
If you don’t have a kit, a thin finish nail angled into the joist works as an alternative repair. Drive it at an angle, then sink the head below the carpet fiber so the repair stays hidden and the flooring stays safe.
- Locate joist with a stud finder.
- Use a breakaway screw for a clean, concealed repair.
- As an option, drive a thin finish nail at an angle and sink the head below the carpet.
Quieting Noisy Staircases
A few targeted repairs on stairs stop most noise and protect your hardwood and subfloor from further wear. Start by walking each step and feeling for loose joints. That tells you where to work first.
Apply carpenter’s glue to thin wood shims and gently tap them into gaps between treads and risers. Trim any excess with a utility knife on enclosed stairs to keep the look neat.
- Screw wood blocks into the corners where risers meet treads for added support to your stairs and wood flooring.
- Glue and nail quarter-round molding along each step edge to hide gaps and reduce creak underfoot.
- Locate loose joists or joints first; tightening screws or adding a shim often solves the problem.
- Use a single screw or small trim screw where a snug connection is needed for long-term hold.
- Test each repaired step by walking the run; repeat nearby if you still hear noise.
These simple steps help you fix squeaky areas without removing boards. They keep stairs safe and quiet in your home while preserving the look of your flooring.
Proactive Maintenance for Long-Term Silence
Keep your rooms quiet by treating upkeep as a simple routine. Small, regular checks stop minor movement before it becomes a persistent problem.
Control indoor humidity to limit wood expansion and contraction. Use a dehumidifier in damp seasons and a humidifier in dry months to protect boards and the subfloor.
Address leaks and water damage immediately. Warping or rot can weaken joists and damage floorboards, turning a small noise into a costly repair.
- During installation, add construction adhesive between subfloor and joists to lock layers and reduce movement.
- Check and tighten screws and fasteners in high-traffic areas on a yearly schedule to keep support solid.
- Apply a light dusting of powder or graphite annually along seams in busy areas to cut friction at the surface.
- Inspect for gaps and loose boards by walking the area; small adjustments prevent larger structural issues later.
These proactive tips protect your hardwood and other flooring types. A steady maintenance process is the best long-term solution for quiet, durable floors in your home.
When to Call a Professional
When small repairs no longer quiet your rooms, a licensed contractor can diagnose deeper issues with squeaky floors and flooring structure.
If the noise returns after several DIY attempts, hire a pro to find the root cause. A technician will inspect joists, the subfloor, and fasteners like screws to spot hidden problems.
Visible water damage, rot, or signs of pests are urgent. These conditions can lead to serious damage and need expert repair to protect your home and wood surfaces.
- Persistent noise after DIY suggests a deeper structural problem that needs professional assessment.
- Water stains, soft boards, or insect trails require fast attention to prevent costly repair work.
- Repair costs vary widely—from about $10 for simple hardware to over $1,000 for major subfloor or joist work.
- Licensed, insured contractors with hardwood experience can offer a warranty on repairs for peace of mind.
- Sagging or bouncy areas often mean structural failure; do not delay a professional inspection.
Calling a pro early can save time and money. They will recommend safe, lasting repairs and help you restore a quiet, stable floor in your home.
Conclusion
Simple, proven methods can restore calm to busy living areas without major demolition.
This guide shows that to fix squeaky floor noises is a manageable project when you follow clear tips. Small repairs can make your rooms more comfortable and protect your investment.
Whether you have hardwood or carpeted areas, there is a practical way to stop creaks. Target the subfloor, joists, or seams with the right tools and materials for long-lasting results.
Follow the steps outlined here as a simple process, and schedule basic maintenance to keep your floors quiet for years. If the job ever feels beyond you, call a professional to ensure a safe, lasting repair.

Ava Harrington is a home improvement writer and DIY enthusiast with over eight years of hands-on experience maintaining, renovating, and documenting residential properties across the United States. She writes practical, no-fluff guides on home care, preventive maintenance, and everyday repairs — helping homeowners protect their properties without overspending or overcompleting.