A slow drain is one of those household problems that starts as a minor annoyance — water pooling around your feet in the shower, a bathroom sink that takes forever to empty — and gradually becomes a bigger issue if ignored. The good news is that most slow drains are caused by simple, mechanical blockages that you can clear yourself without spending money on a plumber or pouring corrosive chemicals down your pipes.
In fact, the liquid drain cleaners you see on store shelves are often the wrong tool for the job. They’re harsh on pipes, dangerous to handle, and frequently don’t fix the underlying problem. This guide gives you four effective, chemical-free methods to clear a slow drain, helps you understand what’s actually causing the problem, and tells you exactly when it’s time to call a professional.
Why Drains Slow Down: The Real Causes
Before you reach for any solution, it helps to understand what’s actually building up in your drain. The causes differ significantly between kitchen and bathroom drains — and that difference should drive your choice of method.
Bathroom Drains
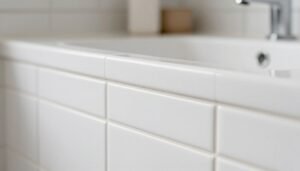
Bathroom drain clogs are almost always dominated by two culprits: hair and soap scum. Hair accumulates around the drain stopper and in the first few inches of the pipe, catching more hair with every shower or shave. Soap scum — the waxy residue left when soap reacts with the minerals in hard water — coats pipe walls and binds to hair, creating a dense, sticky blockage. In bathtub drains, old rubber stopper components can also partially collapse and restrict flow.
Kitchen Drains
Kitchen sink clogs are primarily built from grease and cooking fats. When hot grease goes down the drain, it’s liquid — but as it cools in the pipe, it solidifies and adheres to the pipe walls. Over time, these grease deposits narrow the pipe, and food particles passing through get trapped. Coffee grounds, eggshell fragments, and starchy foods (pasta, rice, potato peels) are also common contributors. Unlike hair clogs, grease clogs tend to be spread over a longer section of pipe rather than located in one specific spot.
Mineral Buildup
In homes with hard water, calcium and magnesium minerals can build up inside pipes over years, progressively narrowing the interior diameter. This is a slower process than organic clogs but ultimately requires descaling treatments or professional pipe cleaning if it becomes severe. Mineral buildup is often a contributing factor rather than the sole cause of a slow drain.
Method 1: Baking Soda and Vinegar
This is the gentlest method and the right starting point for most mild to moderate slow drains, especially in bathrooms. It works through a fizzing chemical reaction that helps dislodge soap scum and light organic buildup, while also deodorizing the drain.
What You Need
- 1/2 cup baking soda (sodium bicarbonate)
- 1/2 cup white vinegar
- A kettle or pot of very hot water (see FAQ about boiling water on PVC)
- A drain cover or cloth to block the drain opening
Step-by-Step Instructions
- Remove the drain cover if possible and clear any visible hair or debris from the opening by hand (use gloves). This step alone often significantly improves flow.
- Pour the 1/2 cup of baking soda directly down the drain. Try to get it into the drain opening rather than spreading it around the basin.
- Immediately follow with the 1/2 cup of white vinegar. The mixture will fizz and bubble — this is the reaction you want, and it helps agitate buildup inside the pipe.
- Quickly cover the drain with the cover or a cloth to direct the fizzing action downward into the pipe rather than back up into the sink basin.
- Wait at least 15 minutes. For a stubborn drain, wait 30–45 minutes or even leave it overnight.
- Flush with a full kettle of very hot (not quite boiling) water. The heat helps melt and flush away soap scum and grease that the reaction has loosened.
- Test the drain’s speed. If it has improved but is still slow, repeat the treatment once before moving to a more mechanical method.
This method works well for routine maintenance and mild bathroom drain slowdowns. It is less effective against solid hair clogs or heavy grease accumulation, for which you’ll need the methods below.
Method 2: Drain Snake or Hand Auger
When the baking soda treatment doesn’t fully clear a drain, or when you can tell by sound and drainage pattern that there’s a physical blockage, a drain snake is the right tool. It physically reaches into the pipe and either breaks up or pulls out the clog.
Types of Drain Snakes
Plastic drain hair remover tools (sometimes called “Zip-Its”) are inexpensive ($3–$5) flexible plastic strips with barbs that pull hair clogs out of bathroom drains. These work very well for the most common bathroom drain clog — hair around the stopper assembly.
Hand-crank drum augers (typically 15–25 feet of cable) are the standard DIY snake for sink drains. They’re ideal for bathroom sinks, tub drains, and kitchen sinks. A basic hand auger costs $25–$60 at a hardware store and is a worthwhile investment for any homeowner.
Toilet augers are a specialized type designed specifically for toilets, with a protective sleeve to avoid scratching the porcelain bowl. Do not use a regular drain snake in a toilet — you’ll likely scratch the bowl.
How to Use a Hand Auger
- Remove the drain cover and the stopper assembly if possible (most pop-up stoppers in bathroom sinks lift out after unscrewing a small retaining nut under the sink).
- Insert the auger cable into the drain opening. Feed it slowly — don’t force it.
- When you feel resistance, you’ve likely reached the clog. Lock the cable at that position using the drum’s locking screw.
- Rotate the handle clockwise while applying gentle forward pressure. The auger tip will either break through the clog or hook into it.
- If it hooks in, carefully pull the cable back while continuing to rotate — this pulls the clog out. Have paper towels ready; it will be unpleasant.
- Once the clog is removed, flush the drain with hot water for 2–3 minutes to clear any remaining residue.
- Clean the auger cable before retracting it into the drum to avoid contaminating the housing.
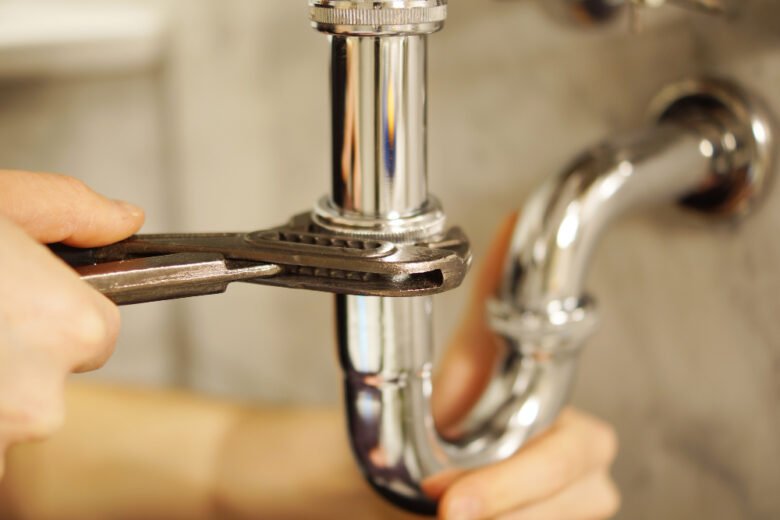
Method 3: P-Trap Cleaning
The P-trap is the curved section of pipe directly under your sink — the U-shaped bend you can see when you open the cabinet below. It exists to hold a small amount of water at all times, which creates a seal that prevents sewer gases from entering your home. It also catches heavy objects (jewelry, small toys) that fall down the drain. But it’s also a prime accumulation point for grease, hair, and debris, and cleaning it out directly is often the most thorough solution for a kitchen sink that remains slow after snaking.
What You Need
- A bucket or large bowl to catch water
- Slip-joint pliers or channel-lock pliers
- Old towels or rags
- A small bottle brush or pipe cleaning brush
Step-by-Step P-Trap Removal and Cleaning
- Clear out the cabinet under the sink and place your bucket directly below the P-trap.
- The P-trap is held in place by two slip nuts — one where it connects to the drain tailpiece coming down from the sink, and one where it connects to the drain pipe in the wall. Loosen both by hand or with pliers, turning counterclockwise.
- Once both nuts are loose, carefully slide the P-trap down and out. Water (and whatever is trapped in it) will pour into your bucket — this is expected.
- Examine the contents. You may find a dense mat of hair and soap scum, solidified grease, or even a lost item.
- Clean the P-trap thoroughly with a bottle brush and warm water. For grease buildup, a bit of dish soap helps cut through the residue.
- Also use your bottle brush or a rag to clean the inside of the drain tailpiece (the short vertical section above where the P-trap connected) as far up as you can reach.
- Reinstall the P-trap by hand-tightening both slip nuts first, then giving them a quarter-turn more with pliers. Do not overtighten — hand-tight plus a small snug is sufficient for plastic fittings and prevents cracking.
- Run water and check immediately under the sink for any drips. A small drip at the slip nuts usually means they need one more slight tightening turn.
Method 4: Drain Cover and Hair Trap Installation
Prevention is the easiest maintenance. A hair catch drain cover in your shower or tub drain is one of the single most effective low-cost home maintenance tools available. It requires no tools to install, costs $5–$15, and can prevent the majority of bathroom drain clogs entirely.
Types of Hair Traps
- Flat mesh covers: Sit directly over the drain opening. Effective but need to be cleared after every shower.
- Silicone dome covers: Pop over the existing drain cover. Easy to remove and clean, very effective at catching hair.
- In-drain filter inserts: Fit inside the drain opening itself, below the cover. Less visible and very effective.
Maintenance schedule: Remove and clean hair trap after every shower or bath. Rinse under hot water weekly. Replace when the mesh starts to degrade or corrode, typically every 1–2 years.
When NOT to Use Chemical Drain Cleaners
Liquid chemical drain cleaners (products containing lye/sodium hydroxide or sulfuric acid) come with risks that often outweigh their convenience:
- PVC pipes: The heat generated by the chemical reaction in some drain cleaners can warp or damage PVC drain lines, particularly in older installations.
- Older galvanized or cast iron pipes: Repeated chemical use accelerates corrosion inside aging pipes.
- Septic systems: Chemical drain cleaners kill the beneficial bacteria in your septic tank that break down waste — this disrupts the entire system and can lead to expensive septic failure.
- Complete blockages: Chemical cleaners are largely ineffective on full, solid blockages. They’ll pool above the clog, sit in contact with the pipe, and potentially cause damage without ever clearing the drain.
- Safety risk: These are among the most corrosive household chemicals available. Skin and eye contact causes serious burns. Mixing with other cleaners (especially ammonia-based products) produces dangerous fumes.
When to Call a Plumber
DIY drain clearing is appropriate for individual fixture clogs. But some drainage problems require professional equipment and expertise:
- Multiple fixtures draining slowly at the same time: If two or more drains in your home — bathroom sink, tub, and toilet simultaneously — are slow or backing up, you likely have a main line blockage rather than individual branch-line clogs. Main line clogs require a professional drain cleaning machine (power auger or hydro-jetting) to clear safely.
- Gurgling sounds from other fixtures: When you drain the sink and hear gurgling from the toilet, or when you flush and water backs up into the tub, this points to a main sewer line problem that is beyond DIY scope.
- Repeated clogs within days of clearing: If a drain you just cleared is slow again within a week, the blockage is either too deep or too dense for manual methods, or there may be a pipe damage issue (root intrusion, pipe collapse) that requires professional camera inspection.
- Sewage smell from drains: A persistent sewer gas smell can indicate a dry P-trap (pour a cup of water into rarely used drains to refill it), but it can also point to cracked drain pipes or vent stack problems that need a licensed plumber.
Prevention Habits That Make a Real Difference
- Use a hair trap in every shower and bathtub drain. Clear it after every use.
- Never pour cooking grease down the kitchen drain — even with hot water running. Let it solidify in a container and dispose of it in the trash.
- Run hot water for 30 seconds after every time you wash dishes to help push grease through the pipe and out to the main line.
- Once a month, pour a kettle of hot water down the kitchen drain to melt and move any grease accumulation.
- In the bathroom, do the baking soda and vinegar treatment as a monthly maintenance flush, not just when the drain is slow.
- Keep coffee grounds and starchy food scraps (pasta, rice, potato peels) out of the garbage disposal — these are common contributors to kitchen drain buildup.
Frequently Asked Questions
My drain is slow again just two weeks after I cleared it — what now?
A clog that returns within two weeks is telling you that either the original blockage wasn’t fully cleared (a deep, dense grease clog that was only partially disrupted), or that the conditions creating the clog are still present. For bathroom drains, make sure you’ve installed a hair trap — the clog will keep returning if hair continues to accumulate. For kitchen drains, examine your grease disposal habits. If you’re confident the cause has been addressed and it keeps recurring, it’s time for a professional drain cleaning with a power auger or hydro-jetting to fully scour the pipe interior.
Is it safe to use boiling water on PVC pipes?
True boiling water (212°F / 100°C) is not recommended for PVC drain pipes. PVC can begin to soften and warp at temperatures above 140–170°F, and repeated exposure to boiling water can loosen the solvent-welded joints in your drain system. The practical solution: use water that is very hot — just below boiling, around 160–180°F, which is what you get from a kettle shortly after it boils or from a very hot tap. This is hot enough to melt soap scum and grease without posing any risk to PVC fittings. Metal pipes (cast iron, galvanized steel, copper) can safely handle boiling water.
How do I know if my clog is in the branch line or the main sewer line?
Branch line clogs affect only one fixture — one sink, one tub. Main line clogs affect multiple fixtures simultaneously, because all your branch lines feed into the main sewer line that exits the house. The clearest sign of a main line problem is sewage backing up into the lowest fixture in the house (usually a ground-floor tub or floor drain) when you use water elsewhere. If you flush upstairs and see backup in the downstairs tub, call a plumber immediately — this is a main line blockage and attempting to clear it yourself can create a serious sewage overflow situation.
Does baking soda and vinegar actually do anything useful, or is it just a fad?
The fizzing reaction between baking soda and vinegar produces carbon dioxide gas and water — it has real value as a mechanical agitator of loose buildup, and baking soda is genuinely effective as a mild abrasive and deodorizer. That said, it is not as chemically powerful as sodium hydroxide drain cleaners, and it won’t cut through a dense solid clog. Think of it as a maintenance tool and a first line of defense for mild slowdowns — not a solution for fully blocked drains. Used monthly as a preventive treatment in shower and kitchen drains, it genuinely helps keep pipes cleaner.
Can I use a wet/dry shop vac to pull a clog out?
Yes, this is a legitimate technique for some clogs. Set your shop vac to wet mode, create a tight seal over the drain opening (a wet cloth wrapped around the hose end helps), and run the vac for 30–60 seconds. This suction can pull lightweight hair and soft clogs up and into the vac rather than pushing them further down. It works best on shower drains and sink drains with soft, hair-based clogs near the surface. It is less effective on deep or grease-based clogs and will not work if the clog is in the P-trap or deeper in the drain line.

Ava Harrington is a home improvement writer and DIY enthusiast with over eight years of hands-on experience maintaining, renovating, and documenting residential properties across the United States. She writes practical, no-fluff guides on home care, preventive maintenance, and everyday repairs — helping homeowners protect their properties without overspending or overcompleting.