Have you noticed your sink’s stream becoming weaker over time? Many homeowners experience this frustrating issue with their kitchen and bathroom fixtures.
The problem often stems from accumulated debris in the aerator component. This small device at the tip of your fixture mixes air with liquid for a smoother stream.
Regular maintenance prevents mineral deposits from affecting performance. A simple cleaning routine can restore optimal flow in minutes.
This DIY approach requires basic household items and minimal effort. You don’t need special tools or professional help to achieve noticeable improvement.
Following our straightforward guide will help you tackle this common household issue confidently. Let’s explore the quick fix that brings back strong, consistent performance.
Key Takeaways
- Weak flow often results from debris accumulation in the aerator
- Regular maintenance prevents mineral buildup and maintains optimal performance
- Basic household items are sufficient for effective cleaning
- The cleaning process requires minimal time and no special tools
- Proper care extends the lifespan of your fixtures
- This solution works for both kitchen and bathroom fixtures
- Immediate improvement in flow is typically noticeable after cleaning
Understanding the Common Culprit Behind Low Faucet Pressure
The gradual decline in your fixture’s output often stems from an easily overlooked component. This small device plays a crucial role in your daily water usage experience.
Faucet aerators are hollow metal cylinders that screw onto the tip of your spout. They create a clearer, more controlled stream while incorporating flow restrictors for conservation.
These devices work by introducing air into the liquid stream. This process regulates water flow and significantly reduces splashing during use.
Mineral deposits from hard water supplies create the most common blockage issues. Calcium and magnesium accumulate over time within the small openings.
This mineral buildup gradually restricts the passageway for liquid. The result is diminished performance that affects your household tasks.
Debris from plumbing systems also contributes to obstructions. Rust particles from older pipes and sediment from water supplies can clog the aerator’s tiny holes.
These clogs directly impact your fixture’s pressure and consistency. You might notice reduced flow or uneven streams that make washing dishes take longer.
The problem often manifests as frustrating splashing or weak output. Many homeowners experience these issues without recognizing the simple solution.
Understanding this common household challenge helps you address it effectively. Regular attention to this component maintains optimal performance.
Key Signs Your Faucet Aerator Needs Immediate Cleaning
Your fixture’s performance tells a clear story when something needs attention. Recognizing these signals early prevents more serious issues from developing.
Several distinct indicators suggest your device requires prompt maintenance. These symptoms typically appear gradually but become increasingly noticeable over time.
Changes in Water Flow and Pressure
You might notice tasks taking longer than they used to. Filling pots or washing hands becomes frustratingly slow.
The stream feels weaker when compared to other fixtures in your home. This reduced output indicates potential obstruction in the device.
Unusual Stream Behavior and Visible Indicators
Instead of a smooth, consistent flow, you might see erratic patterns. The liquid sprays at angles or splashes outside the basin.
Visible particles sometimes appear in the stream, indicating debris accumulation. The aerator itself might show white crusty buildup around its edges.
These mineral deposits accumulate gradually from your home’s supply. They restrict the passageways designed for optimal performance.
Auditory Clues and Persistent Problems
Unusual sounds often accompany obstructed devices. Hissing or whistling noises signal restricted passage through small openings.
Sometimes, cleaning provides only temporary improvement. The problem returns quickly, suggesting significant buildup or potential component wear.
Persistent issues may indicate the need for replacement rather than simple maintenance. Professional assessment helps determine the best solution.
Gathering Your Supplies for Effective Faucet Care
Before beginning any maintenance work, gathering the right tools is essential. Proper preparation ensures a smooth process and protects your fixtures from damage. Having everything organized saves time and makes the task more efficient.
Essential Tools for Removal and Cleaning
You’ll need basic implements to safely disassemble the device. An adjustable wrench or pliers work well for loosening tight components.
Wrap these tools with electrical tape to prevent scratches on metal surfaces. This simple step maintains your fixture’s appearance during maintenance.
Keep a small bowl handy to hold disassembled parts. This prevents losing tiny components during the process.
An old toothbrush serves as an excellent scrubbing tool. Its bristles reach into small spaces without causing damage.
For stubborn debris, a sewing needle helps clear clogged openings. Use it gently to avoid bending delicate metal pieces.
Recommended Cleaning Solutions and Safety Gear
White vinegar stands out as the primary solution for dissolving deposits. Its acidic nature breaks down buildup effectively and safely.
For tougher mineral accumulation, consider lemon juice or commercial cleaners. Always ensure proper ventilation when using stronger solutions.
Protective gear includes PVC gloves and safety eyewear. These items shield your skin and eyes during the maintenance process.
A soft cloth helps dry components after cleaning. Masking tape or a rubber jar opener can ease removal of stubborn parts.
Proper equipment selection ensures both effectiveness and safety throughout your DIY project. This approach maintains your fixture’s performance and longevity.
Step-by-Step Guide to Cleaning Your Faucet Aerator
The actual cleaning process involves three straightforward stages anyone can master. These instructions ensure safe and effective removal of accumulated debris.
Following this systematic approach restores optimal performance to your fixture. Each phase builds upon the previous one for complete results.
Step 1: Safely Removing the Aerator from the Faucet
Begin by shutting off the supply completely. This prevents accidental spraying during disassembly.
Use pliers wrapped with tape for better grip and protection. Twist counterclockwise to loosen the component.
Apply steady pressure to avoid damaging the threads. Gentle force typically works better than aggressive turning.
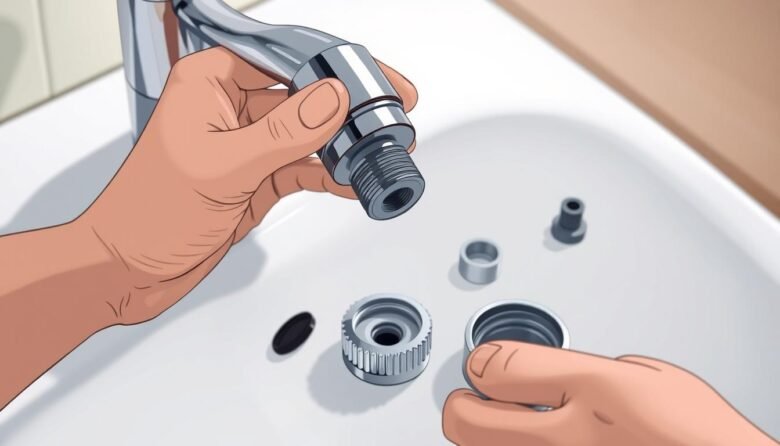
Step 2: Disassembling and Soaking the Components
Carefully take apart the assembly while noting the order. Taking photos during this process helps with reassembly later.
Submerge all parts in white vinegar solution. This acidic liquid dissolves mineral accumulation effectively.
Allow thirty minutes soaking time for typical cases. Overnight immersion works better for heavy deposits.
Step 3: Scrubbing and Rinsing Away Mineral Deposits
After soaking, use a toothbrush to scrub each piece thoroughly. Pay special attention to screen surfaces and small openings.
Clear clogged holes gently with a toothpick. Avoid metal tools that might damage delicate components.
Rinse everything under running liquid to remove debris. Ensure all vinegar residue gets washed away completely.
Proper cleaning now ensures better performance later. This maintenance extends your fixture’s lifespan significantly.
Reassembling and Testing Your Faucet for Optimal Performance
Putting everything back together correctly ensures your efforts pay off. This final stage brings your fixture back to peak condition.
Proper reconstruction guarantees long-lasting results from your maintenance work. Following these instructions carefully prevents future issues.
Properly Reconstructing the Aerator Assembly
Begin with the rubber washer placed firmly in the base. This creates a tight seal when reinstalled.
Stack the screens from finest to coarsest mesh. The correct order ensures proper filtration and consistent flow.
Add any flow restrictor if your model includes one. Then place the mixer component and top washer.
Screw the cap on using hand pressure only. Never use tools for this final step to avoid damage.
Reinstalling the Aerator and Checking for Leaks
Twist the reassembled unit clockwise onto your fixture. Hand-tightening provides sufficient security without risk.
Gradually turn on the water supply to test your work. Watch carefully for any moisture around the edges.
Run the liquid for a full minute to clear residual debris. Observe the stream pattern for consistency.
Proper installation immediately improves water quality and performance. Your fixture should now function perfectly.
Regular cleaning extends the life of your components. This simple maintenance keeps everything working smoothly.
Proactive Maintenance and Long-Term Faucet Care
Maintaining your fixtures properly ensures lasting performance and efficiency. A consistent approach prevents common issues before they develop.
This section covers essential strategies for keeping everything working smoothly. You’ll learn when to service components and when replacement makes more sense.
Establishing a Regular Cleaning Schedule
Set reminders to inspect your devices every three to six months. This frequency prevents significant accumulation from forming.
Regular attention maintains optimal performance throughout your home. It also helps you spot potential problems early.
Consistent maintenance reduces the need for major interventions later. This approach saves both time and money over the long term.
When to Consider Replacing Your Aerator
Sometimes cleaning doesn’t restore proper function. Persistent issues indicate possible component failure.
Visible damage like corrosion or cracked seals requires replacement. Devices older than two years may need updating.
Modern units often feature improved designs and materials. Upgrading can enhance your overall experience.
Solutions for Homes with Hard Water
Areas with high mineral content require special attention. More frequent vinegar soaks help manage deposits.
Whole-house filtration systems reduce sediment throughout your plumbing. They protect all fixtures from accumulation.
Specialty aerators designed for challenging conditions offer better performance. They handle mineral-rich supplies more effectively.
Proactive care extends fixture lifespan and maintains quality. Your efforts today ensure reliable performance tomorrow.
Enjoying Consistent Water Pressure and Flow
This simple trick restores strong flow and saves time in daily tasks. Your fixtures perform better with minimal effort.
Regular upkeep prevents buildup and keeps your system efficient. It also reduces costs and supports conservation efforts.
Keep white vinegar and basic tools nearby for quick sessions. This makes maintenance easy to incorporate into your routine.
Homeowners now have the knowledge to maintain optimal performance. Enjoy reliable results and smooth operation every day.

Ava Harrington is a home improvement writer and DIY enthusiast with over eight years of hands-on experience maintaining, renovating, and documenting residential properties across the United States. She writes practical, no-fluff guides on home care, preventive maintenance, and everyday repairs — helping homeowners protect their properties without overspending or overcompleting.